Lightroom Export Settings Every Photographer Must Know About Them

Editing with Lightroom is an amazing experience but when I try to export my edited images then I become a little bit confused about export settings. Then I found some best Lightroom Export Settings that I’m going to share with you. Here are detailed export settings to maintain the high resolution of the images.
I’m going to discuss exact export settings for the web and all social media platforms including Instagram and Facebook. These are a little bit complicated due to the different settings of Lightroom as compared to other Adobe Lightroom Alternatives. But I’ve described them most easily which will help you to access your edited content easily.
Choosing the Best Lightroom Export Settings
Here are detailed export settings that you need to know while exporting images from Lightroom to Social media platforms.
Step 1: Choose Settings Under Export Location
First, choose the file then export, and select the export location that suits best your file. To export the file with original photos select “same folder as original photo”. On the desktop, you can also save them in a folder. To save edited images you can also use Lightroom MOD APK catalog options or can save them in a subfolder.
To access them later synchronize the folder Library > Synchronized Folder. Choose the exported file or name this file. Lightroom MOD APK has this exporting feature that saves the name of the folder from getting information through the camera. However, there are multiple options that you can use to name the file.

Step 2: Make Changes Under File Naming
Open the file naming tab and rename the file. Then open the filename template editor from the drop-down menu. Lightroom offers different choices for naming files like name, title, Sequence #, and Date. You can also choose metadata copyright and image number. Click Insert to add all changes.

Step 3: Adjust Details Under File Settings
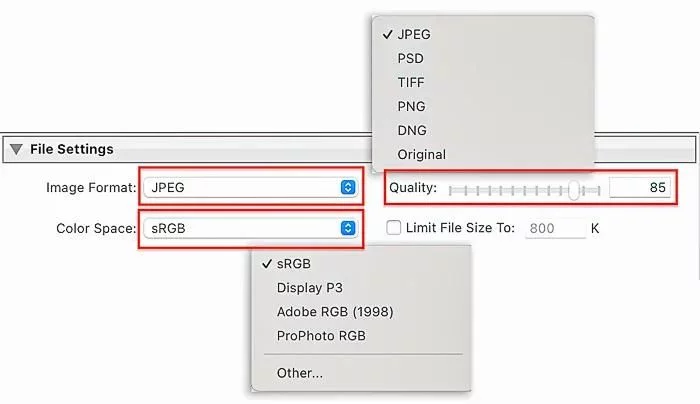
Now you can adjust the details of images under file settings like image size, format, color space, quality, and file size. To display images on web browsers set the image format JPEG, color space sRGB, and quality 100.

Step 4: Adjust Numbers Under Image Sizing
The size of your image varies depending upon the camera system and it also depends upon the screen display settings of the device. The display ratio of the Mac is 2560 x 1600px and 227ppi resolution. Lightroom also gives the option to adjust the size under image sizing.

Best Display Size For Export
If you have edited the wedding image now and want to export it for printing then the original display size works well. To post online you need to check the resize box and can choose the dimensions which you want. All platforms have different optimal sizes for images some crop the image, some keep the maximum size and others allow an aspect ratio.
Recommended sizes for different platforms are given below:
- Instagram: 1,080 x 608px or aspect ratio is 4:5 or 1,080 x 1,350px
- Website hosts: 2,560 x 1,440px.
- Pinterest: Display >> 1000px, Portrait >> 1,000 x 2,100px, Landscape >> 1,000 x 1,500px.
- Flickr Pro: 6,144px or 2,048px Display.
- Twitter: 1,200 x 675px (16:9 panoramas)
- Facebook: 1,200 x 1,500px (4:5 aspect ratio)
Best Export Resolution and The “Don’t Enlarge” Box
If your image is small then you can’t make it enlarge with Lightroom. First, check the box “Don’t Enlarge” or try Photoshop or ON1 RAW AI Resize. If we talk about the best export resolution then it is 72ppi or can increase up to 300ppi.
Step 5: Adjust Output Sharpening
Now adjust the sharpening of the pictures that defines the edges and add brightness to the images. You can also choose from sharpening presets also present in Lightroom CC and Classic. Sharpening also has different levels in Lightroom Export Settings and you can choose from Low, standard, and high.

Step 6: Adjust Metadata Settings
Your image information is saved in metadata including GPS coordinates thus making it easy to find them. You can add any kind of information like your personal details, address, or any detail which you want to add. When you upload this picture then all information along it also uploads but in the case of Instagram, it has an exception where all metadata is stripped off.
But you can also filter out pieces of information like people, and personal information and can upload pictures with camera settings and copyright information.

Step 7: Add Watermarking To Images
If you have edited images for your social media platforms then you can add a watermark to them. It is an art or signing that saves your images when you post them on social media profiles. You can add text or graphics while exporting thus you can edit them later or remove them when you want.
Open the Lightroom Classic click the box next to the watermark and then edit watermarks. Click the icon to open the watermark editor then add graphics or type text then adjust its size, opacity, or position.

Step 8: Setup Export Presets Settings
Lightroom Export Settings has various steps that you can forget easily. To make it easy set up export preset settings from Lightroom export’s dialogue. Simply click on the add button to choose your favorite export preset settings.
Best Lightroom Export Settings For Different Platforms
Besides the steps mentioned above, Lightroom Export Settings are also available to export images for the intended use. These settings are used by professional photographers who help build a strong portfolio to draw more potential clients.
1- Lightroom Export As Catalog
Lightroom export settings have several catalog systems and when you choose to export photos then it gives the option of “Share As A Catalog” and this process is really easy as compared to other ones. When you choose this option the new catalog connects with photos and their information from metadata. Here are some steps that people do to export images from the catalog:
- Create a new catalog select the image and give it a name then choose its locations.
- You can decide whether you want its previews or original photos to be exported with it.
2- Lightroom Export Settings For Print
Wedding images can be edited on Lightroom and to export them for printing there are different sizes available from wallet to gallery size. As their export is done in large-size formats so lightroom ensures to maintain their high quality. Here are some best Lightroom Export settings for print that maintain the quality of images:
- Open the file settings, select JPEG format, and place the slider at 100 that maintain its quality. While exporting never choose the “Limit File Size” option.
- Again never check the option of “Resize to Fit Box” so that the image’s large size should be maintained.
- Make sure the resolution is 300 pixels for high-resolution images and then on your intended base output sharpening will be set. At the start, you can choose the “Matte Paper” selection
3- Lightroom Export Settings For Web
Best Lightroom Export settings are also available for the Web and the image’s small size is important in this case despite high resolution. Here are detailed Lightroom Export Settings For Web that provide high-resolution image export.
- Open the file settings select JPEG image format and set slider 77-100. Then to meet the requirements select “Limit File Size” from Color Space Lightroom export settings.
- The image size has the option to “Resize to Fit Box” from where you can select the desired size. 2048 pixels are recommended for the web but again you can set them as per your need for the website.
- Set the standard resolution for the web under an image size of 72 pixels per inch. Before exporting set the output sharpening of the images.
4- Lightroom Export Settings For Instagram
Lightroom Export Settings for the web can also be applied to Instagram. But here are some key points that you must be aware about them:
- Long edge pixel 2048
- Image quality must be 100 at the start
- Set 72 pixels resolution
Set the small image size for better display and you can also share the work with clients for preview.
5- Lightroom Export Settings For Facebook
Image size set automatically for Facebook with high-resolution keeps image quality at 100. Don’t forget to set sharpening for the screen at a high amount. You will see a huge difference by yourself.
Why Exporting Photos From Lightroom is Complicated?
Multiple reasons make exporting photos from Lightroom complicated. Some of them are given below:
1- Saves Images Differently
Lightroom saves images differently following its non-destructive features. Your original photos remain as it is while other Adobe software does not contain these features they make irreversible on original content. The changes that you make to your photos are saved in metadata options. Exporting the same image in different formats becomes a little bit complicated.
2- Unique Catalogue System
While editing in Lightroom you can save your images in unique catalog systems thus you can place your images anywhere you want and can set a preview. You can select multiple catalogs and can do backups as well. So, it has a detailed process for exporting photos from Lightroom.
3- Export Based on Intended Use
In the end, the photo intended use matters a lot while exporting whether you want to export your photos for print or to share them on social media platforms. Keep an eye on export settings that will make sure the exact placement or export of images is based on the intended use.
Why Right Lightroom Export Settings are Important?
Right, Lightroom Export Settings are important because they make sure that you export exact images of intended use and that they display correctly. It maintains the quality of images including their formats, colors, and image details on different social media platforms. If you don’t use the exact Lightroom Export settings then your pictures will be blurry or have default formats.
These right settings check all the issues and also keep your file size small for better export. Because large image sizes become difficult to share on different social media platforms, especially on mobile devices.
Why Use Lightroom Export Presets?
Lightroom is known for its export presets because with just a few mouse clicks and some shortcut keys like “CTRL-Shift-E” or “CMD-Shift-E,” you can export all images without any trouble. Lightroom export presets have pre-defined settings that allow you to export multiple images at once or the same image in different formats.
These lightroom presets have predefined settings that save you time and energy to export photos. They help to do edit work seamlessly which provides a better user experience.
Conclusion
No doubt Lightroom Export Settings are a little bit complicated but my step-by-step guide will help you a lot. Right export settings will improve the quality of your image and take great care of its color, pixels, and formats. In Lightroom, you can choose different formats of the same image while exporting.
Choose the best Adobe software for editing your images and export them to your social media platforms as well. Based on image intent use I’ve found the Lightroom export settings excellent. It makes my day give it a try!


